

Manage participants
“Participants List” contains the contacts registered for the session. By default it displays their category, first name, last name, company, email address, status, and creation date.
View the list
Section titled “View the list”- Open the session.
- Under “Participants”, select “Participants List”.
- Use “Search by name, email…” to find a contact.
- Select a column heading to sort the list.
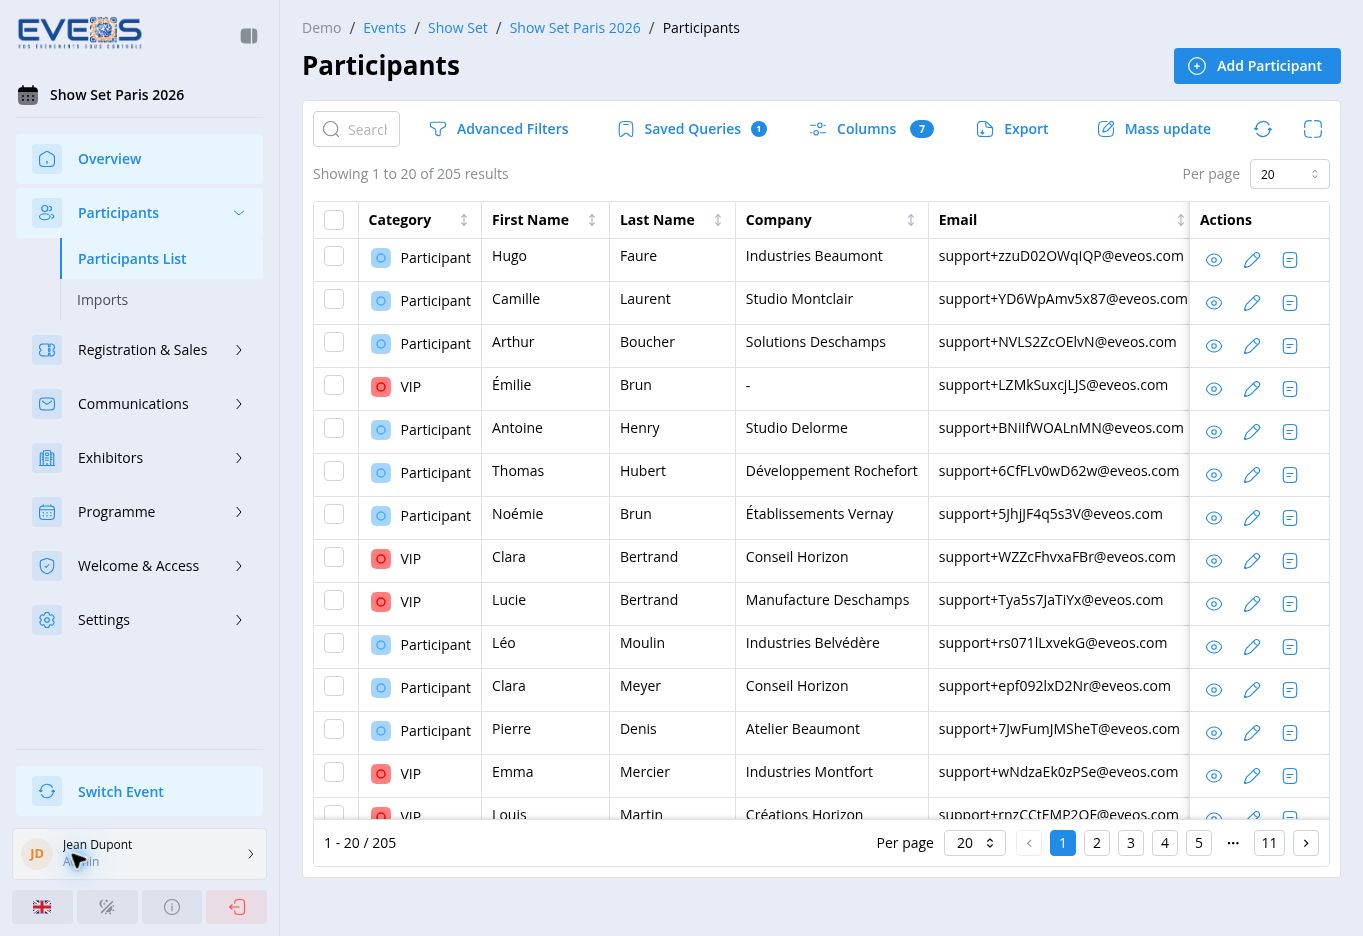
The list shows 20 results per page; you can switch to 10, 50, or 100 results. The commands above the table also provide “Advanced Filters”, “Saved Queries”, “Columns”, “Export”, and “Mass update”.
Each row offers the “View”, “Edit”, and “Delete” actions, plus “Print Badge” for participants with the “Registered” status. Some actions depend on your permissions on the Participants module.
Understand statuses
Section titled “Understand statuses”| Status | Meaning |
|---|---|
| “Registered” | The registration is valid and complete. |
| “Prospect” | Identified contact who has not registered yet. |
| “Awaiting Validation” | The registration is waiting for manual validation. |
| “Rejected” | The registration was refused during validation. |
| “Cancelled” | The registration was cancelled. |
| “Cancelled (Refund)” | The registration was cancelled following a refund. |
Filter the list
Section titled “Filter the list”The quick search filters the list as you type. For more precise criteria, open the “Advanced Filters”:
- Select “Advanced Filters”.
- Select “Add Filter”, then choose a field, an operator, and a value.
- Combine several filters with “Match All” (AND) or “Match Any” (OR).
- Select “Apply”.
Available operators depend on the field type: text (“contains”, “starts with”…), number and date (“between”, “greater than”, “last N days”…), lists (“in list”), or “is empty” / “is not empty”. “Clear All” removes every filter.
Saved queries
Section titled “Saved queries”A combination of filters can be saved for later reuse:
- Apply your filters, then open “Saved Queries”.
- Select “Save Query” and give it a name.
- Check “Public” to share it with the organizer’s other users.
The menu distinguishes “My Queries” from “Shared Queries”. An existing query can be updated (“Update”), duplicated (“Save as New”), or deleted (“Delete Query”).
Choose columns
Section titled “Choose columns”The “Columns” button opens the “Select Columns” panel: check the fields you need among the “Available Columns” (including the session’s custom fields), reorder them under “Selected Order”, or go back to the initial layout with “Reset to Default”.
Export the list
Section titled “Export the list”The “Export” button offers “Export all columns” or “Export visible columns”. The export covers the list as currently filtered (search, advanced filters, or active saved query).
Exports are generated in the background: follow them in “Export History”, where each export goes through the “Queued”, “Generating…”, and “Ready” states (or “Failed”). Select a ready export to download it.
Mass update
Section titled “Mass update”“Mass update” applies changes to several participants in a single operation — either the participants selected in the list, or the whole filtered population.
- Select participants (or apply a filter), then select “Mass update”.
- Add one or more operations: choose the field to update.
- For each field, choose “Fixed value”, “Variable”, or “Clear”.
- Set the application condition: “Always”, “Only if empty”, or “Only if not empty”.
- Confirm: a summary screen warns you that the operation is irreversible, then a result summary is displayed per field.
Add a participant
Section titled “Add a participant”- On the list, select “Add Participant”.
- If forms are configured for the session, choose the form matching the desired category.
- Complete the form, then submit it.
The displayed form depends on the form template assigned to the participant’s category. If no form is configured, a step-by-step wizard is shown instead: Person (identity and contact details), Company, Participation (category, source, opt-out), and Custom fields if the session defines any.
The participant record
Section titled “The participant record”Select a participant to open their record. It gathers:
- their personal information (including custom fields) and their company;
- their participation: category, status, source, and badge options;
- their “Consents” (terms, personal data, marketing, tracking), with the date shown on hover — see Manage consents;
- their order if any, and their check-in history;
- the “Portal link”: copy it or open it to access the participant’s registration portal;
- their linked participants (group registrations).
From the record you can also edit the participant, send them an email, or print their badge.