

Design a badge template
“Badge Templates” define the size, content, and data printed on badges for a session.
Open badge templates
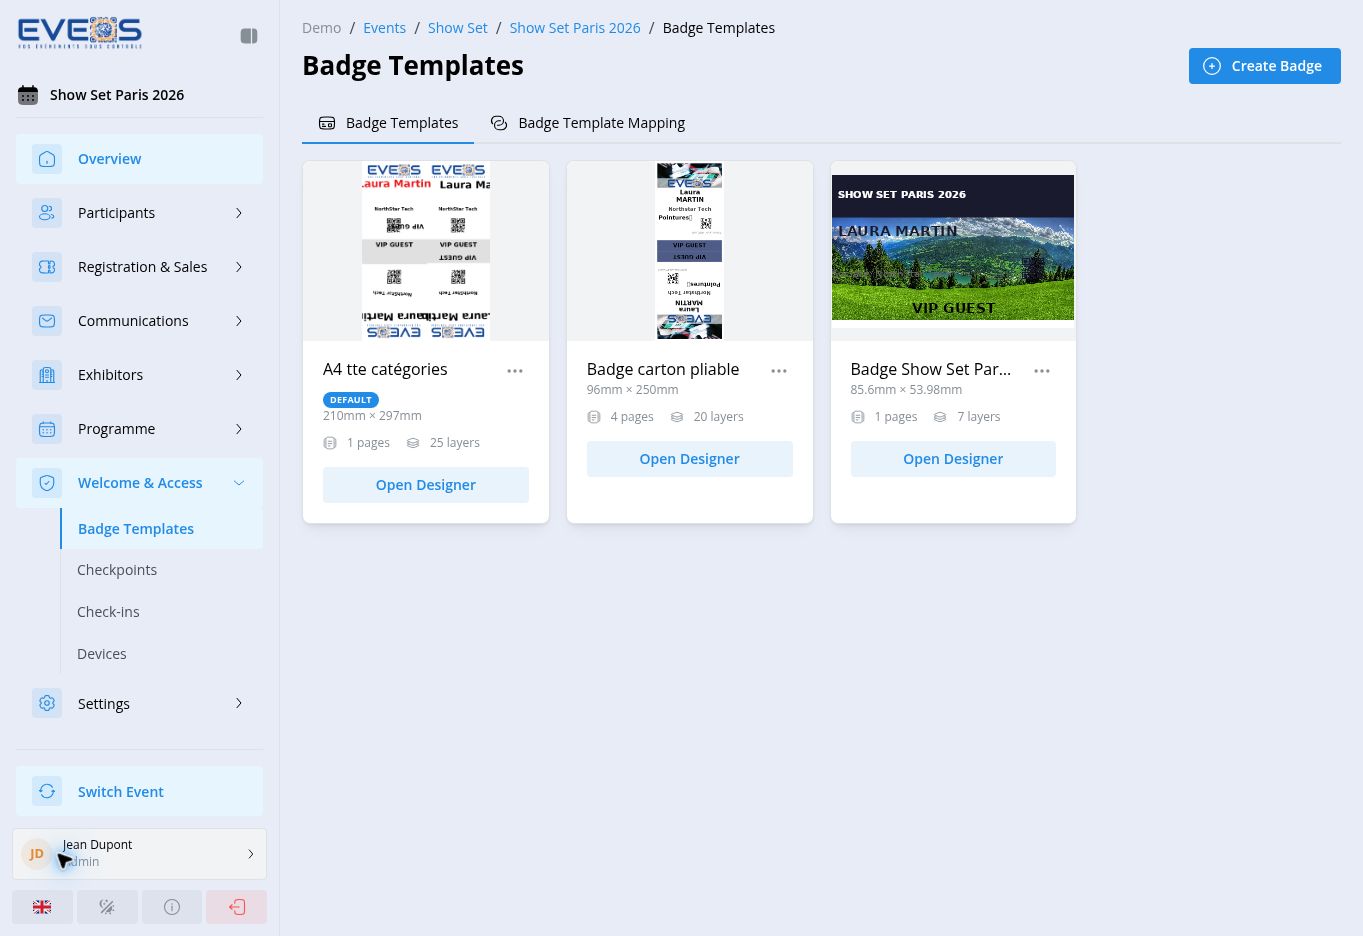
Section titled “Open badge templates”In a session, open “Welcome & Access” > “Badge Templates”. Each card shows the dimensions and number of pages and layers; the default template carries the “Default” badge. Select “Open Designer” to edit an existing template. Each card’s menu lets you “Edit”, “Duplicate”, “Set as default”, or “Delete” the template.
Create a template
Section titled “Create a template”- Select “Create Badge”.
- Under “Choose Badge Format”, select the starting format.
- Select “Create Badge”.
- Replace “New Badge” with a clear name in the top bar.
The available formats include:
| Group | Visible formats |
|---|---|
| Cards | CR80, CR80 Portrait, CR80 Round Hole, CR80 Slot, CR80 Portrait Hole, and CR80 Portrait Slot. |
| Paper Sizes | A7, A6, A5, and A4 in portrait or landscape. |
| Fanfold | 96 × 250 mm fanfold format with fold and holes. |
The page properties let you change the format and dimensions later.
Understand the designer
Section titled “Understand the designer”
| Area | Use |
|---|---|
| Elements | Add text, a shape, an image, a barcode, or a QR code. |
| Quick Fields | Directly add First Name, Last Name, Full Name, Email, Job Title, City, Company, or Category. |
| Pages | Manage the different sides or pages of the badge. |
| Layers | Select and order the objects on the page. |
| Properties | Configure geometry, style, data, and conditions for the selected object. |
| Edit / Preview | Switch between building the template and rendering it with preview data. |
Configure the page
Section titled “Configure the page”When no layer is selected, “Page Properties” lets you:
- enter width and height in millimetres or choose a preset format;
- select the background color and image;
- set top, bottom, left, and right margins;
- open “Page Visibility Rules”.
Open “Pages” to manage a template with several pages. The number beside the heading is the template page count.
Add and organize layers
Section titled “Add and organize layers”- Select an element type or “Quick Field” to add it.
- Select the object on the badge or under “Layers”.
- Move it on the canvas and use the handles to resize it.
- In the layer list, use the drag handle to change its order. The row controls let you show or hide, lock, duplicate, or delete the layer.
- Open “Properties” to complete its configuration.
Configure a layer
Section titled “Configure a layer”Edit the layer name, X and Y position, width, height, rotation, and opacity. “Conditional Rules” can adapt the layer display to badge data.
The available settings depend on the selected layer type. Use this tab for the presentation of text, shapes, images, or codes.
Bind the layer to one field with “Simple Binding”, or combine content with “Template Expression”.
Bind text to data
Section titled “Bind text to data”Simple binding
Section titled “Simple binding”- Select a text layer and open “Data”.
- Keep “Simple Binding” selected.
- Choose the “Data Field”.
- Add a “Default Value” if the badge should show text when the field is empty.
- Apply a transformation, prefix, suffix, or maximum length when needed.
The editor displays the “Current Value” so you can check the binding immediately.
Template expression
Section titled “Template expression”Use an expression when one layer must combine several fields or apply several transformations.
- Select “Template Expression”, then “Use Expression”.
- In the “Expression Editor”, insert fields from “Person”, “Company”, “Category”, “Session”, or “Custom Fields”.
- Add the required text, style, or array transformations.
- Check the result under “Preview”, then select “Save” in the dialog.
The syntax help includes these examples:
{{field}}{{field | uppercase}}{{field | uppercase | bold}}{{field | color:#FF0000}}{{arrayField | separator:";"}}Check and save
Section titled “Check and save”- Open “Preview”.
- Check every page, empty fields, transformed text, images, the barcode, and the QR code.
- Return to “Edit” to correct layers.
- Select “Save”.
Map templates to categories
Section titled “Map templates to categories”Return to “Badge Templates”, then open “Badge Template Mapping”.
- Choose the “Default Template”.
- Under “Templates by Category”, select a different template for categories that need another badge.
- Leave “— No Template —” when a category should keep the default template.
Use the badges
Section titled “Use the badges”Once templates are mapped, badges can be used in several places:
- from the participants list, print an individual badge or start a bulk print (a PDF gathering the badges; participants without a mapped template or not validated are skipped);
- in an email template, the
{{badgeUrl}}variable provides the link to the participant’s badge; - in an exhibitor portal, the Badges List component lets exhibitors download their badges individually or as an archive.